
Author: Amrita Khandelwal
May 12th, 2025

Event Tracking is one of the most important ways to understand the user’s journey on your website. It is easy to get lost in the sea of page load-based data which is present by default in tracking tools such as Google Analytics. However, the actions that users take on your website are far more important than just the page load. Imagine navigating to another page as just one of the actions, however there are multiple others such as clicking on outbound links, clicking buttons, playing the hero slider image, downloading a PDF file, and so on and so forth.
Webmasters advise business owners and marketers to capture audience data using website forms which may be lead forms or registration forms. Form submissions are one of the better conversion actions on a website to generate leads or gardening attention for an event or to generate webinar registrations.
While many marketers track event submission of custom forms using plugins on WordPress and Shopify, and even custom JavaScript, it is the ability to track advance data that sets the expert marketer apart. Google Tag manager is one such tool that helps you combine dataset for reporting conversions not just in Google Analytics, but also on other platforms such as Facebook Analytics and LinkedIn Reports.
In this post, we will throw light on how you can setup event tracking on custom forms of your website or the forms which submit without a page refresh or thank you page. Before proceeding ahead, you should familiarize yourself with the user interface and terminologies of Google Tag Manager.
So, let’s get started. There are some essential terms you need to know about Google Tag Manager.
Tags – A tag is a snippet of code which is generally used to send the information from your website to a third party. In Google Tag Manager, you can define different triggers for tags to specify when they should fire.
Triggers – Google Tag Manager offers different types of triggers that can be used to fire tags to evaluate any condition.
Variables – A variable can be used to represent a value. In Google Tag Manager, you can find a set of built-in variables and you can create a custom variable as well with the help of User Defined Variables.
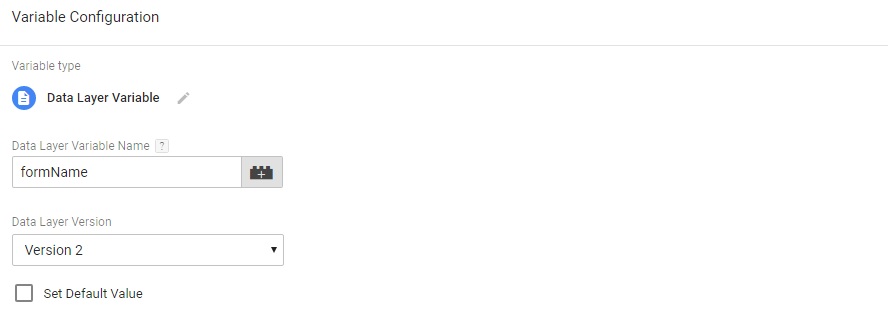
Data Layer Variable – To store and send any additional information to the Google Tag Manager container, you create a Data Layer Variable.
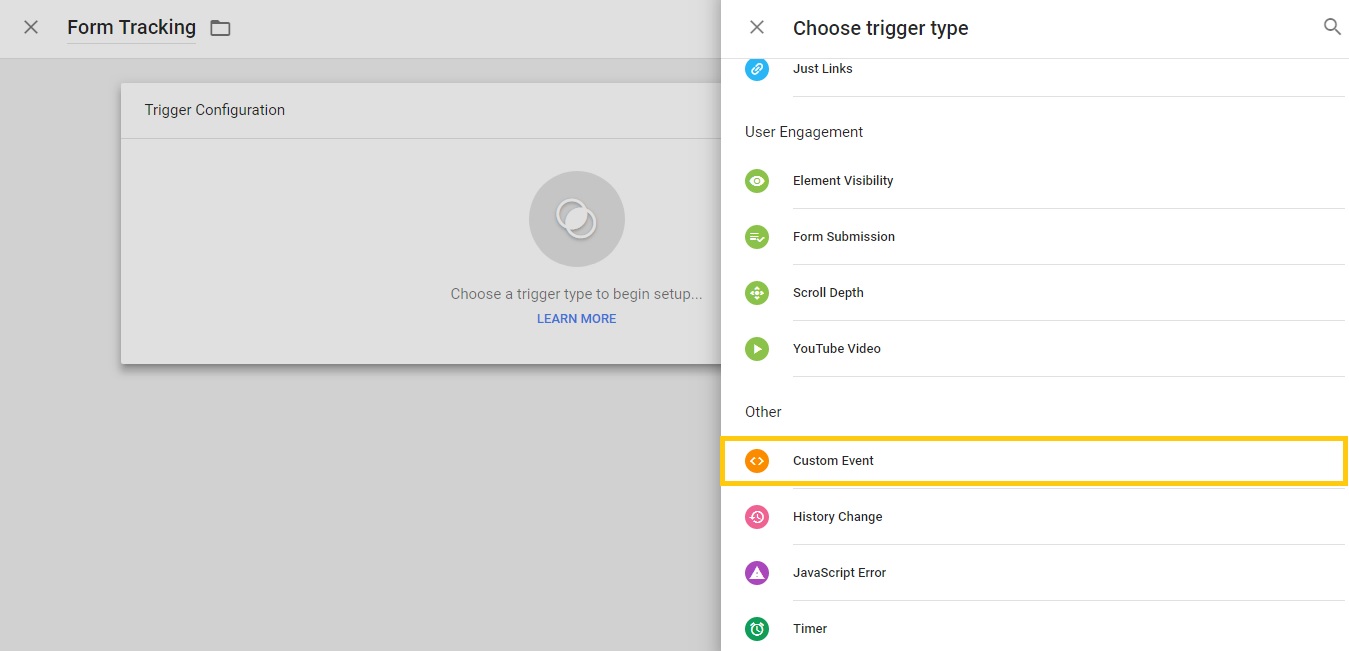
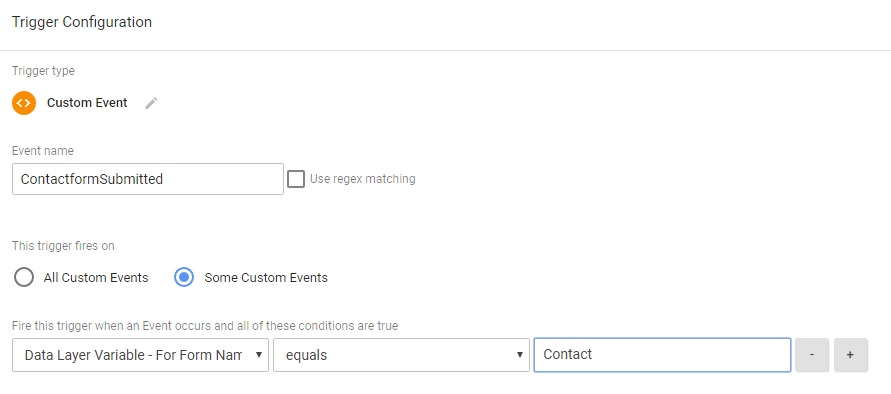
Custom Event Trigger – A custom event trigger listens to the events being pushed by the Data Layer Variable. A custom code can be used to apply advanced tracking on your website.
After you are now familiar with the basic Google Tag Manager terms, now the question is how you will apply the tracking on forms which are submitted without a page refresh. In this case, you need to apply custom event tracking as per the steps mentioned below:
This can be done with a simple code:
dataLayer.push({‘event’ : ‘formSubmitted’, ‘formName’ : ‘Contact’});
![]()
We hope now you would be able to apply some advance tracking for the conversion actions on your website. If you have any question regarding measuring the performance of your online marketing, feel free to reach out to sales@cibirix.com and we can suggest you the best solution as per your requirements.

Since founding Cibirix, Ashish has leveraged his marketing degree to lead the agency in crafting meaningful digital marketing experiences for clients. His results-driven approach is a unique mix of analytical thinking, crisp visual aesthetics and a desire to simplify frontends while developing robust architecture. With a passion for design, technology, & marketing, He leads each aspect of the agency’s business and oversees its talented team of digital professionals.
